7 Everyday Yoga Poses
For Beginners
Note: Friends, if you are comfortable in reading this article in any other language, please change the language from the translate button at the top of this article.
Yoga is a physical, mental, and spiritual practice that originated in ancient India.
It involves a series of postures, breathing exercises, and meditation techniques that aim to promote physical strength, flexibility, relaxation, and inner peace.
For beginners, it's important to start with a gentle and beginner-friendly yoga practice. With regular practice, yoga can help to improve your physical, mental, and spiritual well-being.
7 yoga poses that are great for beginners:
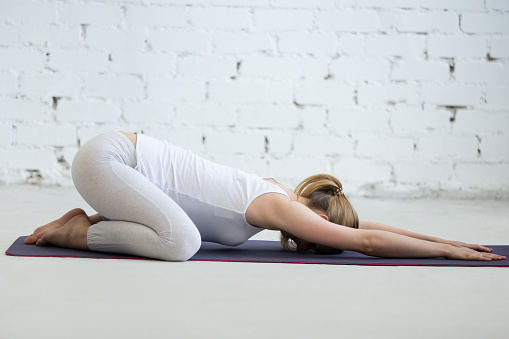 |
| Child's Pose (Balasana) stretches the hips and thighs |
How to do Child's Pose properly?
Here are the steps to practice Child's Pose (Balasana):
- Start by kneeling on the floor with your knees hip-width apart, and your big toes touching behind you.
- Sit back on your heels and slowly lower your torso forward, bringing your forehead to the mat.
- Extend your arms forward, placing your palms on the mat with your elbows resting on the floor.
- Take a few deep breaths, allowing your body to relax and sink into the pose.
- If it's uncomfortable to have your arms extended, you can bring them back alongside your body, with your palms facing up.
- Hold the pose for 30 seconds to a minute or longer, breathing deeply and evenly.
- To release the pose, inhale and slowly lift your torso back up to a kneeling position.
Remember to listen to your body and avoid any discomfort or pain.
You can modify the pose by placing a pillow or blanket under your forehead or chest to support your body.
Health benefits of Child's Pose:
Child's Pose (Balasana) is a restorative yoga pose that can have several health benefits, such as:
Relieves stress and anxiety:
The gentle compression of the forehead on the mat in Child's Pose can help to calm the mind and reduce stress and anxiety.
Stretches the hips and thighs:
Child's Pose provides a gentle stretch to the hips, thighs, and ankles, which can help to release tension and improve flexibility.
Improves digestion:
The gentle compression of the abdomen in Child's Pose can help to stimulate digestion and relieve constipation.
Relieves back and neck pain:
Child's Pose can help to relieve tension in the back and neck, especially when practiced with the arms extended forward or by placing a bolster or pillow under the chest.
Reduces fatigue and improves sleep:
Child's Pose can help to reduce fatigue and promote relaxation, which can lead to better sleep and increased energy during the day.
Lowers blood pressure:
Child's Pose can help to reduce stress and lower blood pressure, which can help to improve cardiovascular health.
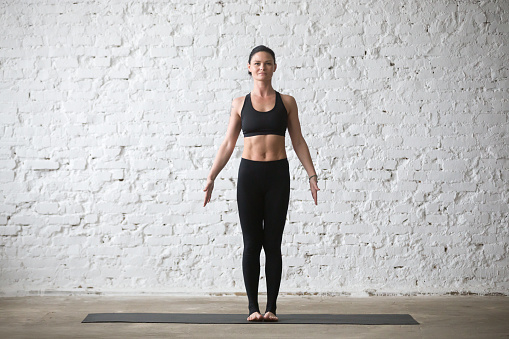
2. Mountain Pose (Tadasana) -
How to do Mountain pose properly?
Here are the steps to practice Mountain Pose (Tadasana):
- Stand with your feet hip-width apart, toes pointing forward, and your arms relaxed by your sides.
- Ground down through your feet, pressing into all four corners of each foot.
- Engage your leg muscles and draw your kneecaps up towards your hips.
- Draw your lower belly in and up, engaging your core muscles.
- Lengthen your spine from your tailbone to the crown of your head, lifting your chest and rolling your shoulders back and down.
- Soften your gaze and relax your facial muscles, breathing deeply and evenly.
- Hold the pose for 30 seconds to a minute or longer, focusing on your breath and the sensations in your body.
- To release the pose, exhale and slowly lower your arms to your sides.
Remember to keep your weight evenly distributed between your feet, and avoid locking your knees or over-arching your lower back.
Health benefits of mountain pose:
Mountain Pose (Tadasana) is a foundational yoga pose that can have numerous health benefits, such as:
Improves posture:
Mountain Pose helps to align the spine, shoulders, and hips, which can improve overall posture.
Increases body awareness:
Practicing Mountain Pose can help you become more aware of your body and your breath, which can help reduce stress and anxiety.
Relieves tension:
Standing in Mountain Pose can help release tension in the body, especially in the shoulders and neck.
Strengthens the legs and core:
Standing in Mountain Pose requires engaging the muscles in the legs and core, which can help strengthen these areas over time.
Improves balance:
Practicing Mountain Pose can improve balance and stability, which can help prevent falls and improve athletic performance.
Enhances concentration:
Focusing on the breath and the alignment of the body in Mountain Pose can help enhance concentration and mental clarity.
3. Downward-Facing Dog (Adho Mukha Svanasana) Pose-
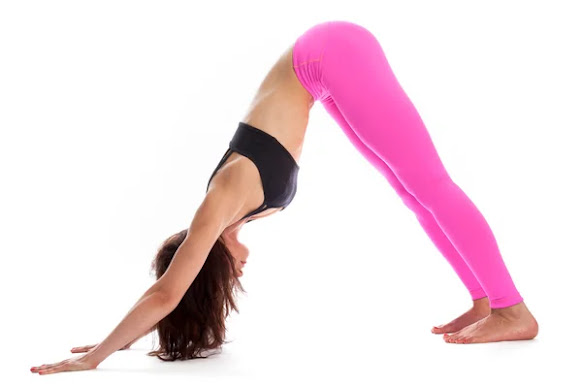 |
| This pose strengthens the upper body and relieves tension in the neck and shoulders |
How to do Downward-facing Dog Pose properly?
Here are the steps to practice Downward-facing Dog Pose (Adho Mukha Svanasana):
- Begin on your hands and knees with your wrists directly under your shoulders and your knees directly under your hips.
- Spread your fingers wide and press firmly into your palms, lifting your forearms and elbows off the mat.
- Tuck your toes under and lift your knees off the mat, keeping them slightly bent.
- Begin to straighten your legs and lift your hips up and back, coming into an inverted V-shape with your body.
- Press your heels towards the floor and lengthen through your spine, reaching your tailbone towards the ceiling.
- Draw your shoulder blades down your back and away from your ears, and gaze towards your navel or between your feet.
- Take deep breaths, inhaling and exhaling through your nose, and hold the pose for 5-10 breaths or longer.
- To release the pose, exhale and lower your knees to the mat, coming back to your hands and knees.
Remember to listen to your body and modify the pose as needed, such as by bending your knees or using props like blocks to support your hands or head.
Health benefits of Downward-facing Dog Pose:
Downward-facing Dog Pose (Adho Mukha Svanasana) is a popular yoga pose that offers numerous health benefits, such as:
Strengthens the upper body:
Downward-facing Dog Pose strengthens the arms, shoulders, and upper back muscles, which can help to improve posture and prevent upper body injuries.
Stretches the hamstrings and calves:
The pose provides a deep stretch to the hamstrings and calves, which can help to improve flexibility and reduce the risk of injury.
Relieves tension in the neck and shoulders:
Downward-facing Dog Pose can help to release tension in the neck and shoulders, which can be especially helpful for those who spend a lot of time sitting or working at a computer.
Improves digestion:
The pose can help to improve digestion by stimulating the abdominal organs and encouraging the flow of blood and oxygen to the digestive system.
Relieves stress and anxiety:
The pose can help to calm the mind and reduce stress and anxiety by promoting deep breathing and relaxation.
Increases energy and circulation:
Downward-facing Dog Pose can help to increase energy and circulation by bringing fresh blood and oxygen to the brain and other parts of the body.
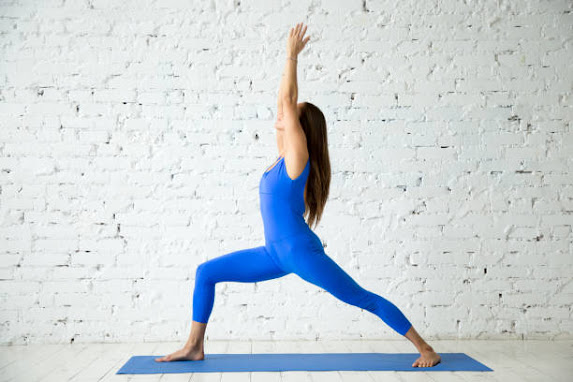 |
| This pose strengthens legs and back and builds core strength |
How to do Warrior I Pose properly?
Here are the steps to practice Warrior I Pose (Virabhadrasana I):
- Begin standing at the top of your mat with your feet hip-width apart and your arms at your sides.
- Step your left foot back behind you, turning your left toes out to a 45-degree angle.
- Bend your right knee and sink down into a lunge, keeping your right knee directly over your ankle.
- Press down through the outer edge of your left foot and engage your left leg, keeping it straight and strong.
- Raise your arms overhead, reaching towards the ceiling, with your palms facing each other.
- Draw your shoulder blades down your back and gaze forward, keeping your neck relaxed.
- Hold the pose for 5-10 deep breaths, or longer if you can.
- To release the pose, exhale and lower your arms down to your sides, then step your left foot forward to meet your right foot.
- Repeat the pose on the other side, stepping your right foot back and bending your left knee.
Remember to keep your hips facing forward and your torso lifted, avoiding any twisting or collapsing in the lower back.
You can modify the pose by using a block or cushion under your back heel or by placing your hands on your hips instead of raising your arms overhead.
Health benefits of Warrior I Pose:
Warrior I Pose (Virabhadrasana I) is a powerful yoga pose that offers numerous health benefits, such as:
Strengthens the legs:
Warrior I Pose strengthens the quadriceps, hamstrings, and glutes, which can improve lower body strength and stability.
Stretches the hip flexors and chest:
The pose provides a deep stretch to the hip flexors and chest muscles, which can improve flexibility and reduce tension in the body.
Improves balance and focus:
The pose requires concentration and balance, which can help to improve focus and coordination.
Builds core strength:
The pose engages the core muscles, including the abs and back muscles, which can help to improve posture and prevent back pain.
Stimulates the lungs and heart:
The pose can help to increase circulation and stimulate the lungs and heart, which can improve cardiovascular health.
Boosts confidence and self-esteem:
Warrior I Pose can help to boost confidence and self-esteem by encouraging strength and stability in the body and mind.
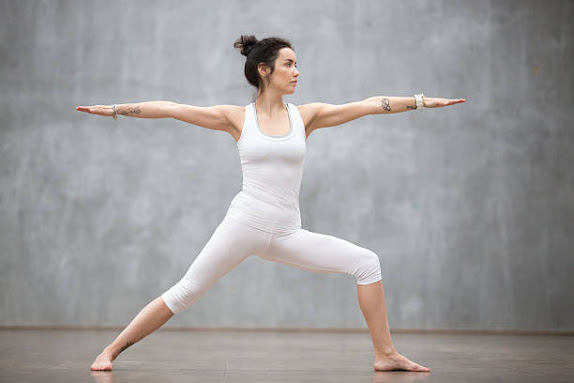 |
| Warrior II Pose opens chest and shoulders |
How to do Warrior II Pose properly?
Here are the steps to practice Warrior II Pose (Virabhadrasana II):
- Begin standing at the top of your mat with your feet hip-width apart and your arms at your sides.
- Step your left foot back behind you, turning your left toes out to a 90-degree angle.
- Bend your right knee and sink down into a lunge, keeping your right knee directly over your ankle.
- Open your hips to the left and extend your arms out to the sides, reaching them parallel to the floor.
- Keep your gaze focused on your right hand.
- Draw your shoulder blades down your back and engage your legs, keeping them strong and steady.
- Hold the pose for 5-10 deep breaths, or longer if you can.
- To release the pose, exhale and lower your arms down to your sides, then step your left foot forward to meet your right foot.
- Repeat the pose on the other side, stepping your right foot back and bending your left knee.
Remember to keep your hips facing forward and your torso lifted, avoiding any twisting or collapsing in the lower back.
You can modify the pose by using a block or cushion under your front heel or by adjusting the width of your stance.
Health benefits of Warrior II Pose:
Warrior II Pose (Virabhadrasana II) is a powerful yoga pose that offers numerous health benefits, such as:
Strengthens the legs:
Warrior II Pose strengthens the quadriceps, hamstrings, and glutes, which can improve lower body strength and stability.
Stretches the hips and thighs:
The pose provides a deep stretch to the hips and inner thighs, which can improve flexibility and reduce tension in the body.
Opens the chest and shoulders:
Warrior II Pose opens up the chest and shoulders, which can help to improve posture and reduce tension in the upper back and neck.
Builds endurance and focus:
The pose requires concentration and endurance, which can help to improve focus, patience, and mental clarity.
Stimulates the digestive organs:
The pose can help to stimulate the digestive organs and improve digestion, which can help to reduce bloating and indigestion.
Builds confidence and self-esteem:
Warrior II Pose can help to boost confidence and self-esteem by encouraging strength and stability in the body and mind.
Our Other Must-Read Articles:
 |
| Tree pose improves balance and stability |
How to do Tree Pose properly?
Here are the steps to practice Tree Pose (Vrksasana):
- Begin standing at the top of your mat with your feet hip-width apart and your arms at your sides.
- Shift your weight onto your left foot, pressing firmly down through the sole of the foot.
- Bend your right knee and place the sole of your right foot on the inside of your left thigh, pressing your foot into the thigh and the thigh into the foot.
- Keep your hands on your hips or bring them together in prayer position at your heart.
- Find a focal point in front of you and keep your gaze fixed on it to help with balance.
- Engage your left leg and press it firmly into the ground, lengthening through your spine and lifting your crown towards the ceiling.
- Hold the pose for 5-10 deep breaths, or longer if you can.
- Release the pose by exhaling and lowering your right foot back down to the ground.
- Repeat the pose on the other side, shifting your weight onto your right foot and placing your left foot on your right thigh.
Remember to avoid placing your foot directly on your knee, and instead aim to place it above or below the knee on the inner thigh.
You can modify the pose by using a wall or chair for support, or by keeping your foot on the calf instead of the thigh.
Health benefits of Tree Pose:
Tree Pose (Vrksasana) is a balancing pose in yoga that offers several health benefits, including:
Improves balance and stability:
Tree Pose requires a great deal of concentration and balance, which can help to improve overall stability and coordination.
Strengthens legs and core:
By standing on one leg, Tree Pose strengthens the muscles in the standing leg, as well as the muscles in the core, hips, and thighs.
Improves posture:
The pose requires the spine to be elongated, which can help to improve posture and reduce tension in the neck and shoulders.
Increases flexibility in hips and groin:
Tree Pose stretches the hips and groin, which can help to improve flexibility and reduce tightness in these areas.
Boosts energy and focus:
Tree Pose requires concentration and focus, which can help to boost energy and improve mental clarity.
Reduces stress and anxiety:
Practicing Tree Pose can help to reduce stress and anxiety by promoting relaxation and mindfulness.
7. Bridge Pose (Setu Bandha Sarvangasana) -
How to do Bridge Pose properly?
Here are the steps to practice Bridge Pose (Setu Bandhasana):
- Lie on your back with your knees bent and feet flat on the floor, hip-width apart.
- Keep your arms at your sides with your palms facing down.
- Engage your core muscles and press your feet into the ground, lifting your hips off the floor.
- Roll your shoulders back and down, pressing your arms into the ground to lift your chest and elongate your neck.
- Keep your thighs parallel to each other and lengthen your tailbone towards your knees.
- Hold the pose for 5-10 deep breaths, or longer if you can.
- Release the pose by exhaling and slowly lowering your hips back down to the floor.
Remember to avoid lifting your hips too high or compressing your neck or shoulders.
You can modify the pose by placing a block or bolster under your lower back for support, or by interlacing your fingers behind your back and lifting your arms off the ground.
Health benefits of Bridge Pose:
Bridge Pose (Setu Bandhasana) is a backbend pose in yoga that offers several health benefits, including:
Strengthens back, glutes, and hamstrings:
Bridge Pose strengthens the muscles in the back, glutes, and hamstrings, helping to improve overall posture and reduce back pain.
Stretches chest, neck, and spine:
By opening the chest and neck, Bridge Pose helps to counteract the effects of sitting for long periods and can help to reduce tension and pain in these areas.
Relieves stress and anxiety:
Bridge Pose can help to calm the nervous system and promote relaxation, reducing stress and anxiety.
Improves digestion:
The pose can stimulate the digestive organs, helping to improve digestion and reduce bloating and constipation.
Reduces fatigue and insomnia:
Bridge Pose can help to alleviate fatigue and insomnia by promoting relaxation and reducing tension in the body.
Enhances lung capacity:
By opening the chest and lungs, Bridge Pose can improve lung capacity and respiratory function.
Friends, Stay Fit, Stay Happy
---------------------------------------------------------
Friends, if you liked it, please share it with your friends.
SHARING IS CARING.
Compiled by: Paramjit Singh Rana


Nice information Paramjit hi, keep guiding
ReplyDelete